Sunday, August 17, 2008

Cycle hard, cycle long...


Ah, Sunday mornings in Waterbury, Vermont, one of the 3.5 places in this state where you can actually get cell phone reception. Laying under a tree in dappled mid-morning sun with my cell phone glued to my ear, dad mentioned that he and Murray went on a 40 mile bike ride yesterday. No kidding--so did I! How beautiful to know that all three of us were rolling through this precious world via our own power atop two spinning wheels.

Let me tell you, folks, if you haven't hopped on a bike recently, you should get your rear on a seat and experience the enlightenment that only two pedals brings. Yesterday, I went on a gorgeous ride through some of the Green Mountains near Yestermorrow. This ride had everything--great conversation, sweat, threatening thunder, grinding 5 mph uphills that give you time to ponder life, and tension-ridden adrenaline-pumping gravel downhills that shake a new vitality and resolution into your soul.

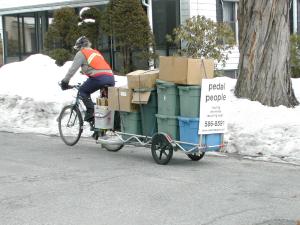
Two of my dreams someday are to live without a car, relying solely on my bike, and to be a bike messenger in a city. I'm almost positive that the latter won't ever happen due to my abhorrent sense of direction. I'm still holding out hope for the first, though. In the meantime, I ride where and when I can, and get wicked excited about folks involved in projects like those pictured above (a friend's boyfriend created this vehicle in Minneapolis) and below (I was bout ready to leave this internship and move to Northhampton when I met a gal who rides for this trash-pickup outfit).

So friends, I say it again: Cycle hard, cycle long...cycle in silence, cycle in song. Cycle through fields and by cows, cycle today--cycle now!

Saturday, August 2, 2008

For Your Viewing Pleasure...

Sadly, last the Natural Building Intensive Program at Yestermorrow came to a close last week. I spent several weeks of class and intern time with these six amazing folks and their teacher as they built the timberframe, natural walled barn that I wrote about earlier. Some of the day to day work and silliness is captured in this YouTube video entitled "Yestermorrow: Behind the Scenes".

In case you're wondering what each scene is depicting, I'll give a brief rundown: Yestercheer, sawing up trees with the Peterson portable mill (go here for another great video of Richard, our sawyer, and the Peterson), our instructor Deva gets jiggy, measuring and recutting strawbales, mixing plaster in the wheelbarrow, fun with the compressed air sprayer, "a day in the life of a natural builder", Natan finds a way to stay engaged during a lecture, blowing in cellulose insulation (made from old newspaper), demonstrating cellulose's fire resistance, hail storm, fooling around with the video rear view mirror. Special Erin appearances happen at 1:30 and 2:44. Enjoy!

Monday, July 21, 2008

Mud Pies and Moisture Dynamics...What More Could a Gal Ask For?

Well, folks, it's been awhile! I'll be surprised if anyone is still checking this blog considering my lengthy cyber-vacation. But here I am, ready to tell ya'll about my latest class: Natural Wall Systems. In a later post perhaps I'll get into the "why's"behind natural building, but for now I'll just give a short definition and then delve into the project I worked on. Natural building means constructing with earth based, renewable materials that are mainly processed on-site by the builders themselves rather than far away in a factory. Remember that timber-frame barn I helped raise several weeks ago? (Heh, if you don't, just scroll down--it was my latest blog entry.) Here's that barn again, now chock full of dirt, straw, sawdust and other wacky materials that we would never think to put in our walls nowadays. Thank goodness for wackiness...I'd much rather be throwing around mud pies than cuddling up to a pretty pink batt of fiberglass. Mmmm.

In the photo above you can see three different wall systems. The system on the doorway wall is called "light straw clay." We gathered clay from a variety of local places (quarry, riverbank), mixed it with water in a big 55 gallon drum, and then used a pitchfork to toss the soupy clay (also called clay slip) and loose straw salad-style. The slightly wet mixture was then dumped in between a double-stud wall that was enclosed with scrap pieces of plywood. After folks tamped down the straw-clay mixture, the forms were removed, revealing beautiful wall sections that held their shape. The picture to the right was taken a week after the wall was finished. There must have been grass seed in our straw bales! Luckily this is fine--there isn't enough oxygen or moisture in the wall to sustain the grass for long. Some natural builders even purposefully include grass seed in thier wall systems; they know when the walls are dry and ready to plaster when the grass is dead.


We used a second system called "wood-chip clay" on the back wall of the barn as well as each of the four outside corners. We mixed a variety of grades (sizes) of woodchips obtained from local sawyers in a concrete mixer with the clay slip. Then we simply dumped the mixture into the stud wall. We didn't tamp because the chips are heavy enough to fill the space without creating any huge air pockets (as would have happened had we not tamped down the light straw clay). Because the chips can't hold thier form in the wall, however, we lathed the inside and outside of the double stud wall (lath are the thin, narrow strips of wood) in order to hold the material in. This was by far the fastest of the three methods because of the use of the concrete mixer and because the wood chips don't compact like the straw does (thus the cavity fills faster). However, the mixer was real loud and used a bunch o gasoline--both tradeoffs in terms of sustainability...I'd love to see a bicycle powered mixer someday!

The main wall system we implemented was the straw bale walls on the east and west faces of the building. Leaving the bales intact, we squared the ends with a chainsaw and laid them longways, brick-style, in the wall cavity. We retied and separated a bale into two if we needed shorter bales. Bales were then attached to studs with long timberlock screws or polypropelene strapping. Once all the bales were in place we took a "persuader"--literally a giant wooden mallet the size of a mailbox--and pounded individual bales that stuck out until the wall was nice and plumb. Then we shaved the entire inside and outside surfaces with a chainsaw (you can use hedge clippers or a weed wacker), beveling window openings.
The key to a straw bale wall system is that it is tight--any holes or spaces are stuffed well before the plaster goes on. So that's what we did--the dark spots in the top picture are handfuls of a straw clay mixture wrung into knots and shoved in between the bales. A tight bale system means virtually no oxygen, which means no possibility of fire and no room for rodents. Yay straw!
After the natural walls were constructed, we sprayed them with clay slip. Well, before we sprayed the walls, we had a little fun with the sprayers ourselves. :) After the wall is wet down, we slapped a gooey, puddin' like consistency of clay and straw on. Usually a building will have two, three or more layers of plaster, using successively shorter pieces of straw and more refined clay and sand as you work towards the outermost layer. Often the last layer involves some sort of lime, especially in climates like the northeast where there's lots of moisture in the air. Lime is durable and also vapor permeable, meaning the wall can breathe in and out moisture. If you put a cement plaster on the wall and the wall hadn't dried out or moisture somehow got in, that moisture would have nowhere to go. The breathability of a lime plaster is an apt metaphor for the vibrancy of the natural building it covers--how meaningful to live in a building created right out in nature with one's own hands.

That's all for now! More before the summer ends.....?? Keep your fingers crossed.

Wednesday, June 4, 2008

Time for a Barn Raisin'!

Yes, friends, I as of this past Saturday, I have officially participated in a barn-raising and also completed my first course at Yestermorrow: Timber framing. Timber frame structures are framed using large timbers held together through a mortise, tenon and wooden peg system, as opposed to, for example, 2X4 stick frame construction fastened with nails and screws. England and France have a rich history of timber frame structures, many of which were built hundreds of years and are still alive and well. In the States, timber framing has experienced a recent renewal as more and more folks are attracted to the beauty of visible timbers in their homes, to the structural soundness and longevity of the buildings, and to the creativity and craftsmanship that often flow from designing and building a timber frame structure.

A couple things surprised me during the course. First, the gratification of using hand tools. During the week, instead of opting modern electric timber framing tools, our mainstays were finely sharpened 1 1/2 and 2 inch chisels, well-kept rip and cross-cut saws, hundred-year-old boring (drilling) machines [see picture below], and a variety of planers (rabbet, spokeshave, scrub). A month ago as I built a deck for a neighbor, I wondered daily how much my hearing and respiratory system was being damaged by noise and fine sawdust. Cheesy as it sounds, hand tools gave the worksite an aura of peace, joy and satisfaction.

Second surprise: I figured that since both our timbers and our structure (a big 'ol barn) were large, accuracy wouldn't be as much of a priority. Wrong! Our instructors Skip and Josh insisted we go down to a sixteenth and sometimes to a thirty-second of an inch. As Dorothy said to Toto, “We’re not at Nazareth Farm anymore.” Why the need for accuracy? The tenons (protrusions chiseled out of the end of a member) must fit exactly into the mortise (hole chiseled where the member’s tenon needs to go), or else lengths and angles that are a sixteenth off at the junction will be magnified the further away you go.

Last surprise wasn’t really a surprise: a barn raisin’ is a helluva lot of fun. The last picture is me attaching the ceremonial "wedding bush" to the apex of the barn as a thanks to the land for giving us the structure's lumber (which, incidentally, was timbered and sawed on Yestermorrow's property). More to come from Vermont, folks. Thanks for being patient.

Friday, May 9, 2008

Yestermorrow: A Groovy Place To Be

Yestermorrow is the design/build school I'll be interning at this summer. Don't worry--"A Groovy Place To Be" is not it's slogan, although doesn't it sound like it fits? The school has a two-fold purpose. First, they aim to integrate design and construction, two phases of the building process that have become increasingly become disconnected. Architects should know how to swing a hammer and builders should have an understanding of the philosophy of design behind what they're building. I'm excited to gain a more nuanced understanding of the design/build movement in the coming months. Secondly, Yestermorrow is committed to sustainable building techniques--strategies that tread lighter on the earth and that will benefit humans now and for generations to come. During my two years at Nazareth Farm, while I certainly believed in fixing leaky rooves and siding unprotected houses, I became increasingly convinced that, because of unsustainable building methods, we were taking one step forward, two steps back. Vinyl siding, galvanized nails, treated lumber, fiberglass insulation...I became more and more aware of these materials' toxic components and consequences. Factory workers who produce the materials are exposed to harmful chemicals that can cause serious health problems. The waste generated from modern construction techniques is horrendous, and that waste goes to rot in landfills that may leech into local water sources. Builders must use all kinds of protection like earplugs, respirators, and skin gaurds if they are to shield themselves from long-term consequences of repeated exposure.

I believe that there is a better way, a more beautiful way, a more wholistic and healthy approach to building. Yestermorrow does too! They offer two- to fourteen-day intenstive courses on everything from passive solar heating and green rooftops to detail carpentry and building a house out of straw bales. From what I can tell, it is a place that values community, creativity, hard work and communication. Sounds like my kind of place.

Every season Yestermorrow hires about five interns who are integral to the operation of the school. We'll be washing dishes, going on supply runs, creating newsletters, doing grounds maintenance and more. In exchange, we get room and board and can take a week of classes for every month we're there, as well as several weekend workshops. The real reason I'm going, though, is because I hear there's an amazing swimming hole just down the road. :) To close I'll leave my contact info for the letter-writers and care-package-senders among you. Better yet, come visit and see what's so groovy about Yestermorrow!

Erin Campbell
189 VT Route 100
Warren, VT 05674

Sunday, April 27, 2008

Bon Appetit!

Are you hungry? Most of the time I am. Or perhaps I'm just used to believing that I'm perpetually hungry…either way, anyone in their right mind will get hungry after looking at the toy kitchen set I FINALLY finished for my two-year-old nephew Simon. Who wouldn’t want to whip up some fried green tomatoes on those sweet black burners, wipe some crumbs off that black walnut and oak countertop, and wash those dishes under such a wickedly vintage faucet? Too bad none of it is real. So the short story on the kitchen set is this: about a year ago, my sister-in-law Kate mentioned that Simon loved playing cook and that she was hoping to buy a mini-kitchen playset for him. I immediately (aka naively) jumped at the chance to construct a simple piece while I was still living at Nazareth Farm in West Virginia with access to a pretty extensive woodshop. Fast forward about eight months, to the day I’m departing from the Farm, as I try to shove a dozen 10 to 12 foot-long planed roughcut boards into my Nissan Sentra, reassuring myself that two weeks was plenty of time to construct a Christmas present masterpiece at my parents’ house in Virginia. I can see you shaking your head right now, which means that you have neither my extravagantly optimistic nature nor my acute sense of denial. Many, many weeks after Christmas, I delivered a massive piece of furniture to Simon’s home, very happy with the result, as presented here for the first time ever on the world wide web:


Now for the shop details, for those of us who enjoy that stuff: The tools of the trade were limited but sufficient: electric jig saw, electric circular saw, two electric drills, hand-held belt sander and vibrating sander. Thank goodness for the resourceful tricks learned to pull while at the Farm—I was able to create a jig system for ripping boards and I jerry-rigged the hand-held sander so that it sat stationery, allowing me both hands on each board as I rounded all edges. Muchas gracias go to Mikey Herr who taught me the joy of clamps—they saved the day many a time. I’m also guessing his workspace would have looked as meticulously tidy and focused as mine did.


On to construction strategies: As you can see in the pic on the right, I chose to use drywall screws (since they’re cheap and since I’ve had very little experience with glues, biscuits, clamps and the like) to attach the side and top boards to poplar bracing boards. I was able to do this all from the inside/underside of the structure (no toenailing!), which makes for the cool effect of having no screws visible on the sides or top of the base structure. To cover for edge-ripping errors that would show had I butted the longsides of the boards against one another, I simply left between 1/8 to ¼ inch space between each board.


I’m really happy with the “hardware” of the base structure: Tina
Bo Bina picked out the perfect “sink” for me one day at Stout’s kitchen supply company in Clarksburg; I created a stencil for the burners and painted them on with layers of polyurethane under and above; and the ridiculously perfect faucet came from a Habitat Re-Store. Incidentally, except for one brass hook purchased at Home Depot, I was psyched to have bought all items from locally owned stores—mainly Fisher’s Hardware in Springfield.

The top shelf worked out real easily thanks to some good luck with my saw blades being set at an accurate 90 degree angle. I couldn’t avoid visible screws for this part, so on my dad’s advice, I bought brass colored screws rather than just using nails. Good thing: on delivery morning, dad and I accidentally pushed the fully constructed top shelf completely off the base. It flew off the slick, polyurethaned base surface, hit the hard concrete basement floor, bounced a couple times, and was perfectly in tact (other than one or two inaugural dents) when the dust settled. Speaking of durability, oak and black walnut make for a structure so heavy that should a tornado, hurricane or nuclear bomb hit Kate and Pat’s townhouse community, the kitchen set will surely be the one beacon of hope left standing.


This last picture shows the cool slidy-shelf feature that was another good dad-idea. You can also see the neat-o spice rack, which ended up both different and better than I originally planned. As for my final comments, I gotta say, building this “damn kitchen set,” as my friends got used to hearing it referred to, was like running a marathon—something that seems cool to me as an idea, but in actuality is a tedious lesson in persistence. I discovered that I’d rather spend a full day’s work outside throwing together the beams, joists and decking of a wheelchair ramp than inside sanding and shellacing the same five boards over and over…and over…again. But it truly was a valuable learning experience and an accomplishment that only my adorable nephew and his fantastic parents could have motivated me to do. Thanks to all who helped!


Saturday, April 26, 2008

The Booger is Back

After a 2 ½ year hiatus, I’ve decided to begin blogging again. My last foray in this niche of the world wide web was in 2005 as I updated family and friends of my cycling across the country adventures. I’ve been doing lots of seeking, soaking in, belly laughing, journeying and growing since those Bike and Build entries, from two intensely rich and challenging years doing home repair in West Virginia, to more recent adventures ranging from playing with straw in Mexico to hanging with my nephew in Virginia. I think the “blog medium” will be a good way to share visual and verbal bits of past adventures as well as future ones. But I’d like to get the disclaimer out of the way from the start: I have no expectations (frequency, eloquency, etc) of myself with this, so you might as well chuck yours in the compost bucket too!